Home Recording
Studio Interfaces
The Digital Transformation
At this point we're ready to select an Audio Interface and get all the cables needed to connect everything.
The Audio Interface is what bridges the gap between your music and the digital recording world in your home recording studio.
We are looking for 3 things in an Audio Interface:
1 - A/D Converters take the analog electrical input signal and convert it into a digital form that the computer can understand.
2 - Microphone Preamps take the relatively weak mic signal and boost it to a usable level.
3 - Phantom Power provides Condenser microphones with the power supply they require to operate.
The all-in-one solution can be found in an Audio Interface.
The main advantage of an Audio Interface is that you get your analog-to-digital converters, mic preamps, and phantom power supply all integrated in a single unit.
Some even have MIDI input/output built-in too (more on that later).
Another great feature is that they connect to your computer via popular interfaces such as FireWire or USB, so you can easily add them to your current computer setup.
Microphone preamps can be bought individually but these can become prohibitively expensive, and are way beyond our home recording needs.
If you plan on playing live then you may consider a Mixing Console, but for home recording only I recommend focusing on Audio Interfaces.
Each AI will come with some kind of software that interfaces with the hardware of your computer.
(This is different from the DAW software you'll use to eventually record. The software I'm talking about here simply defines the parameters of the Audio Interface itself.)
Depending on how it's configured you may be able to control it through your sequencing software as well.
Control Surfaces
One thing I found to be beneficial starting out was to have a physical knob to turn when setting levels, left/right panning, etc.
This desire for an actual "something" to touch was how I originally got knee deep into mixing consoles.
I thought, "Surely I must have to work with faders and dials... I've seen R&B videos... I've seen what these music guys do in their fancy studios. I want to be like THEM!"
Turns out I didn't need a mixing console at all, but now I hope that you can learn from my frustration and mistakes.
In hindsight I wish I knew about Control Surfaces which I believe is a "Best of Both Worlds" solution.
These give you the ability to control your software based DAW Mixer through your recording software, but with the hands-on feel of a physical control interface.
And since it's all digital you don't necessarily need 1 set of controls for 1 physical set of inputs and outputs.
Instead, you can have 1 control that you can toggle between channels with.
In fact, some even have a motorized feature that will move the fader automatically when you change between channels... which, and I shouldn't need to say this, is pretty bleeping AWESOME!
Quick Picks - Control Surface
PreSonus FaderPort USB DAW ControllerChoosing an Audio Interface
Enough of the appetizers, it's now time for the main course!
The decision of which AI you choose will largely come down to the number of mic preamp inputs you'll need.
Or in other words, how many unique tracks do you want to record at the same time.
Are you gonna be a solo act with one vocal mic and one mic for your acoustic guitar? - that's 2 right away.
If your lead guitar guy comes over to jam he'll want to plug in his electric axe to lay down some filthy epic riffs - that's another one... 3 total.
He may even want to mic his background vocals as well - that's 1 more.... up to 4 now.
And those are just the mono inputs - stereo inputs (such as those from a digital piano or synth) will use them up twice as fast.

Keep in mind that it's also common to record an instrument using a few different methods at once, such as recording guitar direct via the pickups and also via a microphone setup by the sound hole.
This gives you the flexibility to combine the strengths of each recording method when you're mixing later on, but at the cost of using 2 mic preamps for 1 instrument.
You can begin to see that these add up in a hurry so think this out for a bit. Try to have some foresight for expansion down the road.
Having a few extra inputs or preamps can help you avoid the headache of owning a piece of gear that can't do what you want.
You know that saying "Less is More"?? Well in this case "More is More" and "Not Enough" will feel like "None".
Check out the dedicated Audio Interface Page for a more in-depth discussion on these important units.
Or if you are ready to pull the trigger on an Audio Interface, check out the Audio Interface Buying Guide to compare several recommended models.
As mentioned above, your Audio Interface will connect directly into your computer, so make sure the interface type (FireWire / USB) is supported by your machine... although most new interfaces are tending toward the USB standard now.
A few quick words of wisdom to any MIDI fans tuning in out there.
If you've heard of MIDI but aren't sure what it's all about then you should visit our MIDI Basics Page to learn more.
Then if this is something you want for your studio I'd just make sure the AI you choose has a MIDI I/O built in.
The newer MIDI controllers will have USB capability, but you can still get good deals on older gear that was the standard MIDI connectors.
Stand alone MIDI interfaces are another option, but I wouldn't recommend spending more dough on a stand alone unit until you've played with one and know you'll need more than 1 input/output that comes with most AIs.
Basic Studio Builder Rating - $$$
Don't try to save money by a getting a cheap interface with only a basic feature set. That'll just make you sad.
This is an investment in the future of your studio. Buying quality hardware with some nice added features will be worth it down the road. Go ahead - be good to yourself here!
Quick Picks - Audio Interfaces
USB Overall Pick (Great Feature Set + Quality)
Roland Quad Capture USB Audio InterfaceUSB Value Pick (Still Great Unit + Less Expensive)
Presonus AudioBox 22VSL USB Audio InterfaceThe Studio Cable Connection
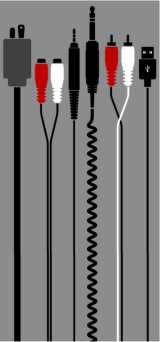
Now that the difficult decisions have been made, it's time to hook everything together so that the precious audio data can be delivered right where it needs to be.
Check out our Studio Cable Page for the whole story on how to get just the right tools for the job.
Since we are not trying to buy gear for life "on the road" we can actually save money on cables.
You'll need a lot of these (plus spares) so they could potentially eat up a lot of the budget.
Many affordable cables have a lifetime warranty, which is good peace of mind if one does fail on you.
There's really no reason to worry though because you can get a quality cable for a good price, and not even have to get your soldering iron from its hiding place.
Plus it's just not a good idea to advertise that you have a Soldering Iron... a party is likely to erupt once word gets out.
Basic Studio Builder Rating - $
These will be connected up at your home and not in a high-traffic danger zone.
If you have the funds, a higher quality will be more robust, but won't alter your sound over short cable lengths.
Quick Picks - Studio Cables
Live Wire Advantage Series 1/4" Straight Instrument CableLive Wire Advantage Standard EXM Series Microphone Cable
Live Wire Dual MIDI Cable


