Gain Staging
Gain Staging is a basic concept that can have a profound impact on the quality of your recordings.
Simply put, it is the process of optimizing your input signal levels in order to maximize signal strength while minimizing noise.
This happens at the input and output of every stage of your setup.
Therefore it's important to understand the ripple effect that occurs when these settings are not planned out properly.
Careful gain staging is critical in setting the levels to maximize the signal to noise ratio of your input signals.
Before we get into how this is done let's first talk about "noise".
What is Noise?
Anyone who's had roomates who like to have disco dancing rave after-parties until 4 am know a thing or two about unwanted noise.
But for our discussion here let's define noise as the unwanted part of a recorded audio signal.
A noisy signal in this context is not necessarily loud, but rather full of sounds that you don't want to record (such as that hissing sound when you REEEALLY crank it up to 11).
Because they are more sensitive, condenser mics are particularly prone to being set too hot and introducing noise into the signal chain.
Check out the example below as I crank the input from the proper level on my input all the way to the max.
This is the hissing sound you want to avoid.
Input Set Too Hot!
There are some different ways you reduce the amount of noise in a signal, and gain staging is an effective and critically important part of this effort.
In the end it comes down to the idea of "garbage in -> garbage out".
If you don't have your levels set properly early on, then you will be fighting an uphill battle to get a clean sound out the other side.
Having a clean input signal often means you have some headroom to spare.
Headroom
This is the difference between the maximum level that can be achieved without clipping and the average signal level.
In other words this is a measure of the total dynamic range that you will have to operate.
Headroom is a function of the type of preamp you are using, and you'll find that the more expensive studio quality preamps offer higher headroom.
This doesn't mean that you can't get a good signal out of a budget mic preamp, it just means that you'll need to be even more in-tune with setting your levels appropriately.
So now that you understand headroom and it's role in your home studio... now you're probably starring at your rig, blinking your eyes, and saying,
"How am I supposed to know when it's right?!?"
As the Beatles sang, We get by with a little help from our friends... so read on and meet your newest friend the Level Meter
The Level Meter and You!
So what does this mean for us in real life? First let's take a look at the following screen shots.
Remember that just like Goldilocks and her porridge, it's worth it to find the setting that's Just Right.
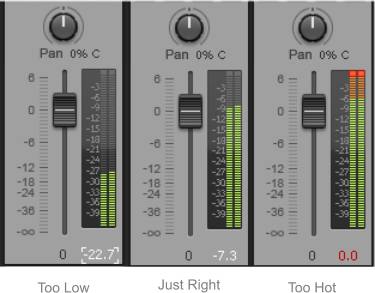
This shows my keyboard at various input settings, which are controlled in the mic preamp portion of your audio interface or mixing console.
Now if the gain is set too hot at the mic pre, then this distortion will trickle all the way down the signal chain.
You'll be frustrated at how bad it sounds and chances are you'll blame the software, your keyboard, the electrical system of your apartment... pretty much anything.
In the same way if the gain is set too low, then the signal will need to be boosted at a later time causing the noise to be boosted right along with it.
As mentioned above, this will cause a similar angry and helpless response.
Before you go out and get all new equipment or quit this all together, make sure have set the level to maximize your signal to noise ratio.
By setting it Just Right you'll get a clean signal that will put a smile on that face.
My strategy is to first make sure the level fader and pan are both set to 0 for the desired channel, then playing as I would during the recording I try to aim for about -10 dB on the meter.
Remember that whereas we humans perceive sound as an average (or Root Mean Square for all you Audiophiles out there), the machines are not so flexible and will punish your recording for exceeding the upper limit even with an instantaneous peak.
Woe be unto those aspiring recordists that push too close to the wretched level of 0 dB, beyond which the dreaded clipping is induced, causing ear piercing awfulness.
If you think this is a bit over the top or dramatic I recommend hearing it for yourself.
Please make sure your monitors or headphones are WAAAY down though.
The Big Picture
In general you can see that gain staging affects every input and requires a well thought out and deliberate setup.
Every step along the way is another opportunity to compound any errors introduced by each additional interface that is included in your setup.
A simple setup may have only one stage (at the preamps like the example shown above) while more complex systems will have multiple opportunities (such as compressors, EQs, and other effects modules) to boost or cut the signal.
And don't forget to consider both the hardware and software components of this issue.
It's not uncommon to have everything planned out perfectly, only to have a strange software setting throw a wrench in the works.
Understanding each step along the path will allow you to break down even the most complex setups into manageable pieces.
Now that you know how to set your levels properly it's time to get recording... Tell them Goldilocks sent you.


