Audio Sampling Rates
Audio Sampling Rates describe the overall number of digital data points collected from a continuous electrical audio signal.
In other words, how many individual points are used to recreate sound that we hear with our ears.
To understand audio sampling rates better we need a basic definition of two key terms: Sampling Frequency and Bit Depth.
Sampling Frequency is simply the rate at which the analog signal is measured.
It is measured in units of Hertz (Hz) which represent the number of samples measured every second.
1 Hz means 1 sample per second. 1000 Hz is 1000 samples per second and so on.
Bit Depth is the number of digital bits used to encode the audio data.
It comes in units of 8, 16, 24, etc. A higher bit depth means a more accurate digital approximation of the analog signal.
When comparing A/D Converters it would be common to see them displayed like this:
24-bit / 48kHz -- where 24 is the Bit Depth and 48kHz is the Sampling Frequency.
Which Sampling Rate Is Right For Me?
If this sounds like you, or someone you know...
"I want my signal to be perfectly recreated! My music needs to be digitally reproduced just like you would hear it live!"
There's someone you should meet.
His name is Harry Nyquist... he's very pleased to meet you.
He has a theorem, which though mathematical and nerdy, can help you rock out with digitally reproduced style.
In summary it is this:
A signal can be reproduced perfectly when the sampling frequency is greater than twice the maximum frequency of the signal being sampled.
"Whoa I this is supposed to be fun? What's up with the Math?!?"
Alright, so it means that if you can take data points at least twice as fast as the fastest thing you are measuring, then you won't miss anything.
Let's have a look at a visual example...
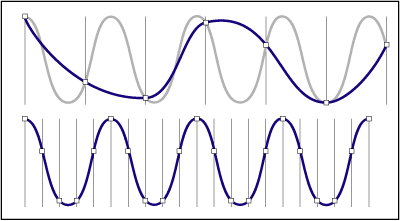
First, we begin by introducing the characters.
The role of the analog signal will be performed by "Grey Wave".
The "Blue Wave" is a digital representation of the analog signal (the Grey Wave).
Notice how in the top example, there are too few data points to adequately describe the Grey Wave.
The top Blue Wave does not look much like the Grey Wave. See how it skips some peaks and is generally misshaped?
Now look at the bottom Blue Wave. Notice that there is a data point at the top, bottom, and midpoint of each instance of the Grey Wave.
If this represented the highest frequency, then we would know we have a good reproduction.
Or the previous statement in plain English... the bottom Blue Wave looks identical to the Grey Wave.
You can see the more and more points we include, the more the digital reconstruction resembles the analog source signal.
But remember that each data point added takes more hard drive capacity and more processing power of your computer, so it's a trade between file size and signal quality.
What It Means To Your Studio
Now I promised I wouldn't get bogged down in tech talk and theory... so here's the bottom line.
Chances are you'll be stumbling around the options menu in your Digital Recording Software of choice and see some menu that resembles either "Sampling Frequency" or "Audio Sampling Rate".
Furthermore, you may see the options for this setting ranging from around 22 kHz on the low side, all the way up to 96 kHz or a staggering 192 kHz on the high end.
The default most likely is around 44 kHz, which may sound a bit low.
Actually this is a good compromise as you will have to balance between CPU power, hard drive space, and sound quality.
I personally can't hear the difference in 44 kHz and 96 kHz, but I sure can see the performance of my machine drop like a ton of bricks and the file size balloon out of control.
This is because it is measuring over twice as much data in the same amount of time.
So if I can't hear it (... and I can't) then what am I doing?
Experiment with a few and see for yourself. If you want a quick and easy answer then I recommend using 44 kHz.
Now onto the next parameter, Bit Depth.
Selecting A Bit Depth
Unlike the difference between 44 kHz and 96 kHz audio sampling rates, the jump in quality between 16-bit and 24-bit recording is actually quite noticeable.
But in terms of data management the argument is still very similar... you are collecting more data at higher bit depths and therefore can expect your file sizes to grow accordingly.
For the added cost in file size, though, you get a nice benefit in the form of an expanded dynamic range.
Remember the dynamic range is the difference between the maximum allowable signal level (the point were digital distortion will ruin a track) and the noise floor (the point where you signal disappears into the background hiss).
An expanded dynamic range will factor into your Gain Staging process.
Here's a quick and dirty estimate for the dynamic range of each bit depth:
8-bit = ~50 dB
16-bit = ~98 dB
20-bit = ~122 dB
24-bit = ~146 dB
Don't forget decibels are logarithmic, check out the Decibel Page for more details on these mathematical gems.
A higher dynamic range will not effect the maximum loudness of your signal, but it will have influence over lowering the noise floor.
So in other words, you will hear more detail but not any more volume at a 24-bit vs a 8 bit-rate.
This is because there are more "digital buckets" for the signal to be more precisely assigned.
My advice is to try it out for yourself and see if you can differentiate between the highest settings.
Once again, for a quick recommendation I'd go with a 24-bit depth if your Audio Interface and software support it.
The juice is worth the squeeze in this case.
Now with your new understanding of Audio Sampling Rates you can stride forward and make these decisions with confidence.
I ain't afraid of no Audio Sampling Rates...


